Picture Frame 2
An Image Picture Frame
There are sites on the Internet that have free picture frame images (please check for any Copyright notices or restrictions). One such site is Creations By Dawn who kindly granted me permission to use one of her picture frame images for this lesson. Thank you Dawn.
You will need three things to complete this lesson.
- An image of a picture frame.
- The photo you would like to set into the picture frame.
- A "table" code to combine the two images together.
Here is the picture frame image we will be using for this lesson. The size of this image is 303 (W) x 303 (H) pixels.

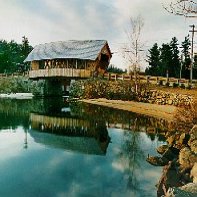
Here is the photo that we will use to set into the picture frame image. The size of this image is 197 (W) x 197 (H) pixels.

It is important that the image you are going to set into the picture frame be the correct size in order to completely fill the blank opening in the center of the picture frame. You can resize your image using a graphics program or adjust the width and height of the image code (this can distort the image sometimes, and is not recommended).
What I did was set the photo into the picture frame image (using the table code that you will find below), then I adjusted the width and height of the photo until the photo fit just right into the picture frame. Now you will know what the exact width and height of your photo has to be if you choose to resize/crop your photo with a graphics program.
Below you will see the finished picture frame image and photo combined using a "table" code.
 |
Below is the "table" code used to combine the picture frame and the photo.
Note: You should bring the closing </td> tag up onto the same line as the image line of code (as in the 3'rd line of code below) or you may have a "space" below the image and it will not fit correctly into your picture frame image. You can read more about this in the first lesson of the Table Tricks page here at Draac.Com.
<table border="0" cellspacing="0" cellpadding="0" width="303" height="303">
<tr><td align="center" valign="middle" background="dawn-frame.gif">
<img src="nh-bridge.jpg" width="197" height="197"></td>
</tr></table>